

What Is Rough Cut Lumber? A Practical Guide for Builders and Woodworkers
Rough lumber fresh off the mill looks nothing like the planed, plastic‑wrapped boards at the home center. It’s thicker, a little wild, and still wearing the saw marks that prove it hasn’t been dressed yet. When people ask what is rough cut lumber, they’re really asking where that material fits: which projects benefit from the extra thickness and character, and which ones will just turn into a fight with your tools.
Start Here: What Rough Cut Lumber Actually Is
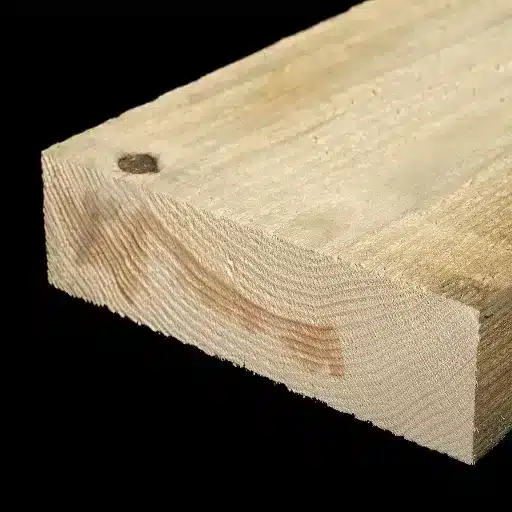
Rough cut lumber is simply wood that’s been sawn to thickness and width at the mill and then left alone. No planing, no sanding, no “dressing” to clean it up.
When someone types what is rough cut lumber, they’re really asking, “At what stage in the process are we talking?” Rough boards are that early stage: straight off the headrig or resaw, still carrying the saw’s scoring lines, still at near‑full “true” size, and still a bit unpredictable in terms of surface and edges. You’d notice it right away stacked next to big‑box 2x4s—the rough stuff often looks a hair larger, fuzzier on the face, and the edges can be slightly out of line or carry a bit of wane.
How it comes off the mill
On a small band mill, the operator dogs a cant in place and slices boards in sequence; those boards go straight to the stack as soon as they clear the blade. On a circle mill, it’s the same idea, just louder and usually faster. No one’s sending those boards across a jointer or planer yet—they’re focused on throughput, thickness targets, and recovery from the log. So you end up with lumber that hits a nominal rough thickness (say 4/4 at about 1‑1/16″), but the faces show every pass of the blade and the edges may wander slightly if the log wasn’t perfectly straight.
Why it’s called “rough sawn” in some places
In a lot of yards and mills, “rough cut” and “rough sawn” are the same thing; the phrasing usually just follows local habit or the way older mill hands were taught to say it. Some hardwood dealers will put “rough sawn” on the tag to signal it hasn’t been surfaced on any side (no S2S, S3S, or S4S), while softwood or farm suppliers might tell customers they’ve got “rough cut barn boards” out back. The important point is the condition, not the label: if it hasn’t been planed or surfaced, you’re dealing with rough stock, whatever the guy behind the counter calls it.
Rough Cut vs Dimensional Lumber: The Real‑World Differences
The clean, barcode‑stamped 2×4 at the home center and the rough, heavy plank at a small mill might share a species, but they behave like different materials on the job. Understanding that difference is what actually answers the question behind what is rough cut lumber in practice, not just on paper.
Sizing and thickness (true size vs nominal)
Dimensional lumber lives in the world of nominal sizes. A “2×4” stud is usually about 1‑1/2″ x 3‑1/2″ once it’s surfaced and dried, and a “2×10” is closer to 1‑1/2″ x 9‑1/4″ than its name suggests. The building codes, span tables, and fastener patterns are all written around those dressed dimensions, not the name stamped on the end.
Rough cut lumber, on the other hand, tends to be much closer to true size. A rough 2×4 from a small mill might actually measure 2″ x 4″ or very close, and a 4/4 hardwood board might come in around 1‑1/16″ thick before any planing. That gives you more meat to work with for jointing, flattening, and final thicknessing, which matters if you’re aiming for a finished 13/16″ instead of being forced down to 3/4″.
There’s a small catch. That extra material is only useful if your process accounts for it. If you design a set of stair stringers or a timber frame detail assuming nominal sizes, then swap in “true” rough stock, your layout, notch depths, and hardware choice can all shift by just enough to throw things off.
Surface finish, edges, and defects
Dimensional lumber is dressed for convenience. Faces are planed, edges are more or less square, corners are eased, and most of the glaring high spots have been knocked down so a DIY customer can throw it straight into a project with minimal tools. You still get knots, checks, and the odd twist, but the surface tells you roughly what you’re dealing with at a glance.
Rough cut lumber shows you everything the saw saw. Faces carry blade marks, light ridges, and fuzz. Edges may wander a touch or carry wane, and you can hit the occasional bark pocket or raised grain that would have been planed off in dimensional stock. That sounds like a drawback until you remember you’re planning to mill it anyway—those defects become part of the yield calculation, not a surprise at installation time.
So the “ugly” surface is really just unedited data about the log. You can read growth rings, stress patterns, and tension in ways that get hidden once everything is planed smooth and neatly packaged.
Moisture content and movement on site
Store‑bought dimensional lumber is sold to a moisture window that suits construction framing. It’s typically kiln dried for softwoods and sits in the 12–19% range for structural use, sometimes drier in premium lines or interior use material. That means its shrinkage and movement after installation are somewhat predictable, even if it still cups or crowns now and then.
Rough cut lumber can land in your yard at very different stages. You might be buying it green off the saw, somewhere around 25–35% moisture, or partially air‑dried in a shed with no firm number attached. That’s fine if you’re building a farm shed that can breathe, or you’re willing to stack and sticker it for six or seven months before furniture use, but it’s a problem if you treat it like ready‑to‑use studs.
Yet that flexibility is exactly why many builders and woodworkers seek it out. You control the drying schedule, the final moisture target, and when you lock it into a project. Dimensional lumber asks you to accept the mill’s and retailer’s choices; rough cut lumber lets you make your own, as long as you’re willing to respect how much that wood still wants to move.
4 Common Uses for Rough Cut Lumber (and When It’s the Wrong Choice)

Rough cut shines where strength, mass, and texture matter more than a polished showroom surface. There are also jobs where using it is just asking for callbacks and cursing at the miter saw.
Outdoor structures: barns, sheds, and farm builds
Barns, run‑in sheds, lean‑tos, and basic equipment shelters are classic rough cut territory. You get full or near‑full dimensions, so a “2x” can actually be close to 2″ thick and carry real weight, which is handy when you’re spanning over a tractor bay or hanging a heavy gate.
The texture doesn’t hurt here either. Rough faces take stain and preservatives aggressively, and nobody on the farm cares if a post has mill marks as long as it stands straight and lasts. It’s also easier to justify using slightly wetter lumber outside; that air‑movement and time do some of the drying for you.
Where it goes wrong is when someone tries to treat a barn like a climate‑controlled garage. Insulating and tightly sheathing over green or semi‑green rough cut can lock in moisture and telegraph movement through drywall or siding. If you’re planning a finished interior in the same building, sometimes you’re better off switching to kiln‑dried dimensional for the inner shell.
Rustic beams, mantels, and feature walls
If you want a beam or mantel that doesn’t look like it came out of a catalog last week, rough cut is an easy win. Leave some saw marks, soften a few arrises by hand, and suddenly that 7‑3/8″ timber looks like it has a story. One small detail: a single pass with a card scraper or nylon brush can knock down fuzz without killing the rough character.
For feature walls, you can resaw and lightly dress rough boards to get a mix of shadow lines, texture, and color variation you’ll never find in prefinished paneling. It’s forgiving too; a slightly cupped board just becomes part of the relief pattern if you plan it.
Where it bites you is tight joinery and crisp lines. If the design is all about perfectly aligned shadow gaps, dead‑straight reveals, and paint‑grade corners, starting from rough cut stock adds hours. You’ll be milling away most of the “rustic” to hit those tolerances anyway.
Furniture, benches, and workbenches
A lot of good furniture starts as rough cut, especially in hardwoods. Buying 8/4 or 5/4 rough stock gives you the thickness to flatten, square, and still land at the exact final dimension you want, which is a big deal for table tops and chair parts. There’s also a cost angle: rough boards are often priced in board‑feet with less retail markup baked into milling.
Workbenches are another great candidate. A heavy top laminated from rough 8/4 slabs will out‑mass most off‑the‑shelf benches, and you can leave the base a bit chunky without bothering with perfect surfacing on every hidden face. It’s a tool, not a dining table.
The wrong move is pushing rough cut into delicate, small‑scale furniture without a realistic tooling plan. If all you have is a benchtop planer and a wobbly contractor saw, trying to pull 1‑3/8″ chair rails and tight drawer parts out of twisty rough boards can waste more stock than you save.
Temporary framing, bracing, and shop fixtures
When you just need something to hold other things in place for a while, rough cut is almost ideal. Temporary wall bracing, concrete formwork, jigs, outfeed tables, and gantry legs don’t care if the face is fuzzy or the edge wanders 1–2 mm over 2 m. They care about stiffness, screw‑holding, and being cheap enough you don’t mind cutting them up later.
You can also get more creative with offcuts. That odd 37″ piece left from cutting rafters becomes a cleat, a clamp block, or a quick fixture in the shop. Rough stock encourages that sort of “use the pile” thinking.
Still, you don’t want to drag too much rough, damp material into a precision environment. If you’re building out fixtures for a CNC, or anything where repeatability matters, movement in semi‑green rough stock can throw your calibration off just enough to make you grumpy. In those cases, surfaced, stable dimensional or fully milled stock is the safer play.
How to Work with Rough Cut Lumber Without Fighting It

Rough cut lumber only behaves badly if you skip the steps that turn it into honest, square stock. Once you treat it as a process instead of a product, the whole “what is rough cut lumber” question becomes “how far do I want to take this board?”
Milling steps: jointing, planing, and squaring up
The workflow is simple on paper: flatten one face, straighten one edge, then make everything else reference those two. In practice, that means jointing a face until it sits dead flat on the tables, then jointing one edge square to that face. Only after that do you head to the planer and thickness the opposite face, using the jointed face as your reference.
On a small shop setup, you might cheat a bit. If you don’t have a wide jointer, you can knock down the high spots with a scrub plane or even a belt sander and then run the board through the planer with the flatter side down. It’s not textbook, but if you’re dealing with 8‑1/4″ rough stock and a 6″ jointer, you do what you have to.
Ripping to final width is the last move, not the first. Once both faces are flat and parallel, you take the jointed edge against the fence and rip the opposite edge clean, then optionally hit that fresh edge with a light jointing pass. One small, real detail here: leaving parts 1–2 mm fat on thickness and width until just before assembly gives you room to clean up dings and handling marks.
Letting boards acclimate before you build
Rough cut often comes in wetter or at least less predictable moisture than surfaced stock. So you can’t just unload, mill to final, and glue up a big panel the same day without courting movement. If the shop is, say, 46% relative humidity most of the year and the boards have been sitting in a damp shed, they need time to meet in the middle.
The usual rhythm is: bring the lumber in, stack and sticker it with real gaps, and give it days or weeks depending on how big the moisture swing is. Then do a light milling pass—flatten one face, take a cleanup pass through the planer, rip a straight edge—and let it sit again on stickers. You’ll see subtle changes overnight; a board that was flat at 4 p.m. might show a whisper of cup by the next morning.
That said, you don’t need to baby every project. For a workbench base or shop fixtures, getting within shouting distance of equilibrium is enough. Save the full acclimation routine for tabletops, doors, and anything with joinery that will advertise your mistakes forever.
Handling splinters, checks, and cupping
Rough cut lumber is honest about its flaws. The tradeoff for that extra thickness and texture is more splinters, surface checks, and boards that like to cup toward the bark side. Gloves help, but so does a quick pass with a stiff nylon brush or card scraper over high‑traffic areas so you’re not pulling a 12 mm splinter out of your palm later.
Checks and end splits are mostly a layout problem, not a tragedy. You plan your cut list to dodge them—marking out parts so the splits fall in the offcuts—and then trim back the worst of the cracked ends before milling. If the ends aren’t sealed, it can be worth hitting fresh cuts with wax or sealer if the boards will sit for a while.
Cupping you manage with both orientation and process. Face the concave side down on the jointer so the board rides its two outer edges, joint until you’ve got solid contact, and expect to lose a bit of thickness on badly cupped pieces. On wide glue‑ups, alternate growth ring orientation so cups counter each other instead of all fighting in the same direction. It’s not magic, just respect for how that board still remembers being part of a tree.
Is Rough Cut Lumber Cheaper? Cost, Yield, and Waste

Rough cut often looks cheaper on the invoice, but the real cost picture lives in board‑feet, knife passes, and how much ends up in the trash can. That’s where a straight “what is rough cut lumber” question turns into a budgeting conversation.
Board‑foot pricing vs big‑box pricing
Most rough cut lumber is sold by the board foot, not by the stick. You’re paying for volume: thickness × width × length ÷ 12, multiplied by a per‑BF rate that changes with species, grade, and whether it’s kiln‑dried or green. That’s why an 8‑ft 8/4 oak plank can look expensive per piece but very reasonable when you break it down across all the parts you’ll pull from it.
Dimensional lumber at a big box is priced per piece or per linear foot, with all the milling already baked into the tag. On paper, it can go either way. A 2025 comparison from a lumber distributor notes that rough‑sawn stock can be more than three times less expensive than the same volume of dimensional lumber in some softwood cases (see ref #1), yet in certain hardwood retail scenarios rough 4/4 can actually work out higher per finished linear foot than pre‑milled 1x boards once you do the math (see ref #3). So you can’t assume “rough” automatically equals “cheap” without running the numbers.
How much material you lose in milling
There’s always a thickness toll when you turn rough into dressed. For hardwoods, many mills target around 1‑1/8″ for 4/4 stock so that, after drying and planing, you can reliably land at 13/16″ or a very solid 3/4″ finished thickness. That extra 1/8″ is there specifically to be sacrificed to cupping, twist, and planer knives.
In practice, you may lose 10–20% of your purchased board‑feet to milling, defects, and layout gaps on a typical furniture run, and some pro guidance even suggests budgeting 25–50% extra rough stock for projects that demand clean, matching boards (see ref #4). The flatter and straighter the original rough cut, the less you grind away. But if you start with twisty 4/4 that was sawn too thin, you might fight just to reach a consistent 3/4″ without dipping below spec on some pieces.
So the apparent price per board foot isn’t the same as the price per usable, finished board foot. You pay for the waste too.
When “cheaper per board” costs more in labor
Even when rough cut lumber is significantly cheaper per unit of volume, someone has to joint, plane, rip, and sort it. A 12‑ft 2×12 that costs 15–25% less rough from a small mill is only a win if you have the machinery and the hours to turn it into the profiles you actually need. Once you factor in knife wear, setup time, and a couple of boards sacrificed to learning or snipe, the savings can evaporate on small jobs.
This is where project scale and shop setup matter. If you’re running a batch of 27 workbenches and your jointer and planer are already dialed, the labor cost per board falls to almost nothing and the rough‑stock savings are real. But if you’re a one‑person shop doing a single dining table with limited tooling, buying surfaced, dimensionally consistent material might genuinely be cheaper by the time the finish goes on, even if the sticker price per board looked higher.
In short, rough cut is often cheaper at the pile, not always cheaper at the finished part. The smart move is to treat cost, yield, and labor as one equation, not three separate arguments.
Frequently Asked Questions (FAQ)
-
Q: What is rough cut lumber compared to the 2x4s at the home center?
A: Rough cut lumber is wood that’s been sawn to size at the mill but not planed, sanded, or surfaced. It’s usually closer to “true” size, so a rough 2×4 might actually be close to 2″ x 4″, still showing saw marks and a fuzzier texture you’d notice when you pick it up. -
Q: Is rough cut lumber actually stronger than dimensional lumber?
A: It can be, mainly because you’re often getting more cross‑section—thicker, closer‑to‑true dimensions and less material removed in surfacing. For a farm gate post or a barn beam, that extra mass matters. But if the rough stock is still very wet or poorly graded, you won’t magically get a stronger structure just because it looks beefy. -
Q: When does rough cut lumber make sense for a DIY project?
A: It’s a good fit when you need thick, character‑heavy material and you’re willing to do some milling: workbenches, rustic shelves, mantels, pergolas, barn doors. For example, buying 8/4 rough oak for a bench lets you plane it to a rock‑solid 1‑3/4″ top instead of being stuck with thin big‑box boards. -
Q: Do I need special tools to work with rough cut lumber?
A: You don’t need a full commercial shop, but you do need a way to flatten and square it—typically a jointer, planer, and a table saw. In a smaller setup, people get by with a lunchbox planer, a straightedge and router sled, and a decent circular saw for breaking down 10–12 ft boards before milling. -
Q: Is rough cut lumber cheaper than store‑bought boards?
A: Often yes on a per board‑foot basis, sometimes 20–30% less than comparable treated or surfaced options because you’re skipping some processing. But you’ll lose some thickness and length to milling, defects, and end checks, and your time on the jointer and planer isn’t free—especially if you’re only building one table, not a batch of twenty.
References
-
U.S. Forest Service. (various years). Wood Handbook – Wood as an Engineering Material. https://www.fpl.fs.usda.gov
-
American Wood Council. (2022). National Design Specification (NDS) for Wood Construction – Dimensional Lumber Sizes and Design Values. https://www.awc.org
-
National Hardwood Lumber Association. (2019). NHLA Rules for the Measurement and Inspection of Hardwood and Cypress. https://www.nhla.com